
How do I use Laravel 8 to integrate Stripe Payment Gateway? So, if you’re curious, you’ve come to the perfect place. We’ll utilize a stripe/stripe-PHP module to handle payment gateway integration in this article. It provides a reliable way of making secure payments in PHP-based apps.
Payment gateway is an essential step for any ecommerce business operation, enabling customers to make secure online payments and completing any ecommerce store’s payment system. However, store owners have limited choices in this aspect, as only a few companies like Stripe and PayPal dominate the top tier of payment gateways.
Stripe is a well-known and trusted payment gateway that people worldwide use to make online payments. Both developers and store owners have found it to be simple to operate. Stripe makes managing things extremely easy, with a user-friendly interface that lets you mitigate issues fast. Many Laravel development service companies choose Stripe as the primary payment gateway solution for all ecommerce stores they construct for their clients due to a plethora of capabilities and a user-friendly Stripe payment gateway integration in Laravel.
PayPal payment gateways are designed to offer a comprehensive security system for online payments that prevents fraudulent attempts. It reduces the likelihood of significant security threats. These gateways allow businesses to concentrate on the advantages of online transactions while keeping their customers and systems safe from outside threats.
Which is Better, Stripe or Paypal?
In order to find the answer to this question, we have decided to compare the two based on the below-written aspects.
Security
The success of Stripe and PayPal can be partially attributed to the overall security of their payment processes. Both payment processors ensure that security measures are simple to deploy and improve general store security. Moreover, Stripe.JS is a highly optimized and security-focused software that empowers users to collect credit card information without storing anything on their servers.
Migration and Data Portability
Moving away from a payment processor puts portability to the test. For example, you face the risk of losing a significant percentage of clients if you use PayPal. And does not allow you to migrate client credit card information, which makes your migration efforts much more difficult. On the other hand, Stripe enables a risk-free transfer to any PCI-compliant platform with no data portability constraints.
Payment Processor API
Stripe’s API is one of the best in the payment processing industry. In order to stay competitive, the PayPal API recently acquired some elements from Stripe’s API. Stripe’s API has a user-friendly UI, excellent documentation, and general simplicity of usage. The great thing is that Stripe provides libraries in all major programming languages, including PHP, Python, Java, and C#, so users don’t have to change their development infrastructure to use the API. Additionally, Laravel Stripe payments are not typically processed on the store’s servers.
Transaction and Service Charges
PayPal charges a 2.9 percent + 30 percent fee for each successful transaction. It also deducts several other expenses that contribute to the overall cost of conducting business.
On the other hand, Stripe charges a minimal cost of 2.9 percent + 30 cents for every successful transaction if the total store turnover is less than $1 million. While the rate varies per country, there are no significant disparities.
Customer Service Issues
Stripe always prioritizes the client, and customizes the services provided to meet market needs. Furthermore, the IRC channels dedicated to Laravel Stripe connection provide an excellent example of Stripe’s diverse support network, as engineers and professional users collaborate to address customer concerns.
In this tutorial, I will demonstrate how to use the Stripe payment gateway in Laravel, with the goal of providing a comprehensive guide that anyone interested in integrating Stripe with their Laravel-powered ecommerce store can follow. First, we will start by setting up a new Laravel application, and then we will move on to integrating Stripe into our application and testing the payment functionality.
Step 1 Laravel Installation
If you have the Laravel application, go to Step 2; command to install the Laravel application on a web server. The ideal setup for this is:
- Laravel
- PHP 7.x
Because of the streamlined dev stack, you can host the application on Cloudways managed Laravel server. Furthermore, I am free of server management headaches and can devote my full attention to my project.
You can also install the Laravel application with composer using the following command.

This command will create a new Laravel project with a name
Step 2 – Stripe Testing Keys
Once you log in and are taken to the Stripe dashboard, you will see the testing keys on the dashboard, as shown in the image below.
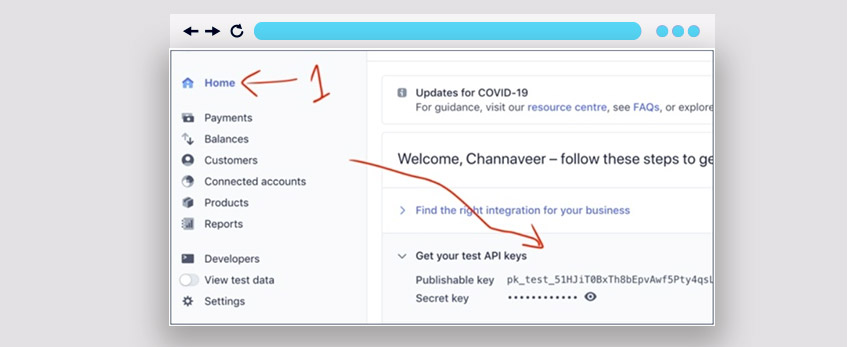
Stripe Testing Keys for dashboard
You can also retrieve the testing or production keys by going to Developers -> API Keys, as illustrated in the figure below.
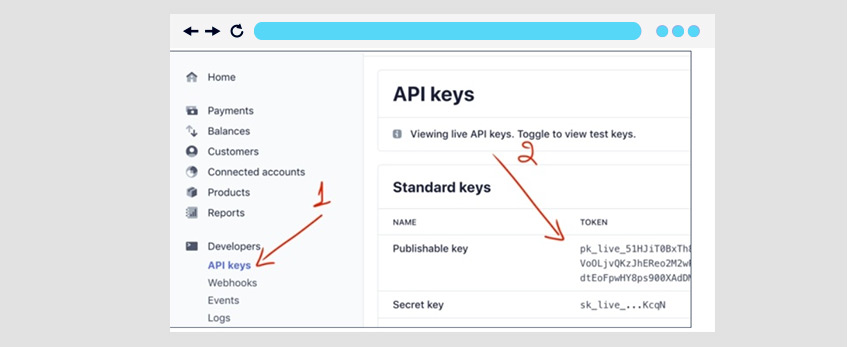
Stripe Testing or Live keys
Step 3 – Stripe Package Installation
To interact with Stripe, we must first install the Stripe package, which we will do using composer.

Step 4- Configure Stripe Public & Secret API Keys
In order to link Laravel to the Stripe payment gateway, we must define the Stripe Publishable and Secret keys in the.env file. They will reach a consensus as we register the Stripe API keys in the env file.
- To get started, visit the Stripe website and register for a developer account
- After signing up, your account will provide you with the Public and Secret API keys that you will require to integrate Stripe into your Laravel application.
- Use a practice account to keep yourself from making a genuine transaction.

Step 5 – Configure Routes
Now, create the two routes that simultaneously manage GET and POST requests in the Laravel Stripe controller for managing Stripe Payments.
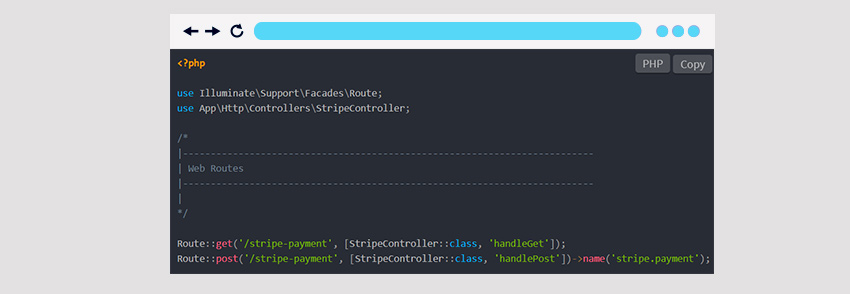
Step 6 – Set Up Stripe Payment Controller
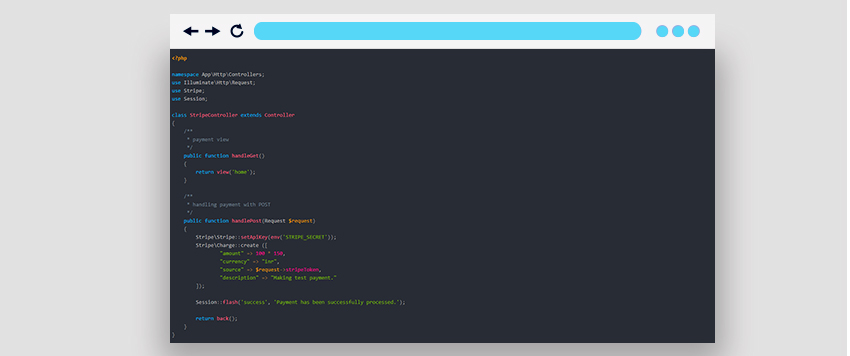
Run command to create a StripeController, and we will write the entire memoir to handle the payments.

Insert the following code in the app/Http/Controllers/StripeController.php file.
Step 7 – Create Stripe Form and Validation
This is the final stage, where we’ll create a form that accepts credit card information as well as some validation rules to ensure that the information is accurate.
To run the application, you have to evoke the following command:

Once the application invoked, you can test the app with the following URL:

If you feel that using only card details is insufficient to adequately test your integration, you may use additional numbers and information to ensure that your integration works as planned. Furthermore, Stripe provides a range of test payment details that you can utilize to simulate different payment scenarios and test your integration thoroughly.
Final Words
We’ve covered three basic levels in this article: Building a Laravel program from the ground up, registering stripe public and secret API keys in Laravel, and integrating a stripe payment gateway into a Laravel Project. In this lesson, we went over a few chapters of payment gateway integration. However, there are still a lot of things to be done. But if you are a beginner, this should be more than enough.
FAQs
Stripe functions on a per-transaction pricing model. You don’t need to pay any setup or monthly/annual charges. There aren’t any hidden fees either, and the pricing is transparent, starting at 3% for cards issued outside India and 2% for cards issued in India.
Start by registering your website on Stripe. Note down the API key for authentication. Use NuGet Package Manager to install the Stripe library. Enter the Stripe. Infrastructure namespace in the Class where you’d like your payment gateway. Set the API key. Create an object for Credit Card and Customer using the Credit Card tokenID. Create a Credit Card Charge object which will be used for the payment. Charge.The status will show the status of the payment.
Register your website on Stripe. Install two Stripe libraries: React Stripe.js and Stripe.js from the npm public registry. Use the loadStripe () function to initiate Stripe in the App.js file. Enter your publishable key. When the function returns a promise that you need to pass the <Elements /> wrapper component, wrap the card input form in it. Render the <CardSection /> component in the <CheckoutForm />. Wrap the <Checkout /> form component with the <ElementsConsumer /> component and pass the properties stripe and elements to the <CheckoutForm />. Create an object for Credit Card and Customer using the Credit Card tokenID. Create a Credit Card Charge object which will be used for the payment. Charge. The status will show the status of the payment.
Stripe supports 3D Secure 2, referring to the three domains of interaction. It has extra fraud protection, strong authentication, and highly successful transactions. However, Stripe falls back to 3D Secure 1 when 3D Secure 2 is unsupported by the customer’s bank.
Start by registering your website on Stripe. Install the Stripe module and check the version in the command prompt. Add a file, for example, index.js, with a command. Enter your publishable key. Run index.js with a command. Open your browser and type in http://localhost:3000/. The payment gateway form should appear with a ‘Pay with Card’ button. Run a test by entering card details and checking if the payment is successful.
Related Articles
-
Where your allegiance lies: Laravel vs Codeigniter?
The use of PHP framework became a compulsion for building customised solutions for the business from the last few years. PHP framework is a modern solution that provides flexibility in
-
Key Benefits Of Using Laravel Framework
Talking About Key Benefits Of Using Laravel Framework , Laravel, the popular PHP Framework, is proving to be substantially better to its peers in the development of websites and web
-
Laravel PHP Services: Top 10 Reasons Why You Should Opt for it
Laravel is a free open-source PHP-based framework that helps in developing responsive web applications. It follows a Model-View-Controller (MVC) architectural model based on Symfony. It has become one of the

